Scrapebox is arguably the most popular search engine scraping software available. So many SEOs and link analysts choose Scrapebox for it’s multiple query filters and support for scraping over 30 different search engines. Google, of course, is the most popularly-scraped search engine. It’s also the most secure search engine as it deploys multiple “anti-spam” measures. Anti-spam measures can limit the amount of scraping results you get. What’s more, is anti-spam measures can cost you money if proxies get banned and need to be replaced.
Why Proxies are Necessary for Scrapebox
Scrapebox is only a powerful scraping tool with proxies installed. Otherwise, if you’re searching a large amounts of queries, it isn’t long before a service detects and blocks your IP. After installing proxies in Scrapebox, it’s important to configure them correctly to yield the most exportable data as possible. You’ll want to use proxies that are only in-use by yourself and untouched by other Scrapebox users.
Plus, getting your personal internet connection blocked by a search engine would certainly be a bummer. To stay safe, secure and undetected it’s necessary to use proxies to harvest URLs in Scrapebox.
Which Proxies are Best for Scrapebox?
If you want to get the best results on Scrapebox, avoid using public, shared or free proxies. In most cases, someone has already made their scraping rounds on search engines with public proxies you’ve come across. By using shared proxies, you’re risking sharing an IP with other Scrapebox users. If there’s two or more Scrapebox users on one shared proxy and they’re targeting the same site, your proxy will be blocked before you know it. Generally, free proxy providers keep server logs, so they’re not entirely anonymous. You’ll also see tons of connection errors being thrown in Scrapebox with shared proxies.
As a matter of fact, using private datacenter proxies can limit your scraping potential in Scrapebox. Most private datacenter proxy providers offer replacements; due to search engine’s anti-spam measures, every proxy’s IP address will eventually be detected and banned. One perk is that datacenter proxies are speedy while they last.
Due to their undetectable nature, backconnect, residential or reverse proxies are the most reliable for scraping with Scrapebox. All three terms refer to one type of undetectable private proxy, but we’ll use backconnect in this guide. Since backconnect proxies send a request from a residential-level IP address, search engines see a request coming directly from a residential connection. With other types of proxies, like datacenter, search engines see requests or queries passing through what they identify as a proxy’s IP address. Proxy detection typically triggers anti-spam measures websites and search engines.
How to Add Proxies to Scrapebox
Adding proxies to Scrapebox is simple. You can add proxies by copying them or import an entire list of proxies in text file format. Whether you’re using backconnect or datacenter proxies; you’ll want to enter them in Scrapebox with IP:Port format. To use proxies with SOCKS protocol, enter an S before each proxy before loading them into Scrapebox. (Example: S1.1.1.1:12345)
SOCKS proxies are meant to be an all-purpose. They can support almost any type of traffic or program. HTTP proxies are designed and work best for the single purpose of browsing websites.
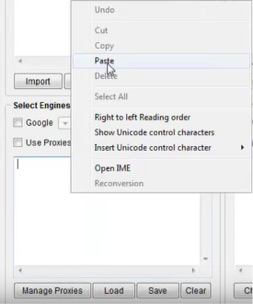
Be sure each proxy is on its own line in your text file, then copy the entire list. Next, right or secondary click in the text area titled “Select Engines & Proxies” then click Paste. You could also save the proxies to a text (.txt) document, then click the Load button to import a proxy list.

Afterwards, you’ll want to set a Timeout so your proxies retry their connection after a set amount of time. In Scrapebox, click the Connections context menu then click “Connections, Timeout and Other Settings.” Under the Connections tab, Change your threads based on what your proxy provider supports. Under the Timeouts tab, I recommend testing a proxy timeout of setting 20-40 seconds to figure out which timeout setting harvests URLs most efficiently for you.
A Summary About Using Proxies in Scrapebox
Entering proxies into Scrapebox is pretty easy; the difficult part is harvesting as many URLs as quickly as possible without your proxies getting blocked or banned. Scrapebox is so powerful that it needs more than one IP address to harvest URLs in its full potential.
When you compare proxy types side-by-side, one particular type stands out as being the most reliable. To avoid blocks and bans from sites, using backconnect proxies will ensure your usage of each proxy goes undetected. Datacenter proxies have good connection speeds, but eventually, they can be banned from repeat queries or requests. I recommend steering clear of shared or public proxies to avoid errors in Scrapebox and so you can stay anonymous.

